
If your casement windows are cranking hard, letting in drafts, or fogging up between the panes, you're not alone. Ontario winters are brutal on hardware and seals, and after 15 to 20 years, most casement units start failing in ways that no amount of adjusting or caulking will fix. Casement windows replacement is one of those jobs homeowners put off until the energy bills get too painful to ignore.
This guide gives you the straight answers: how to tell when replacement beats repair, how to measure your window openings correctly, what it costs in Ontario right now, and whether you should hire an installer or tackle it yourself. We'll also cover where to source quality replacement units without paying inflated retail markups.
We've built and installed casement windows for Ontario homes since 2006, so this comes from what actually works on-site, not generic advice. Whether you're comparing replacement casement windows for one room or planning a whole-house upgrade, you'll walk away knowing exactly what to check, what to ask, and what to budget before you sign anything.
Do you need to replace your casement windows?
Before you spend a weekend hauling out a perfectly good frame, check whether the problem is actually the window or just the hardware. Casement windows rely on how casement windows work: a crank mechanism, hinges, and a compression seal, and any one of those can fail long before the frame itself gives out. If you're only dealing with a stiff crank or a torn weatherstrip, a repair kit or a service call solves the problem for a fraction of the cost of full replacement.
Watch for these signs that point to a real failure rather than a quick fix:
- Visible fog or moisture between the panes, which means the seal between the glass layers has broken and the argon gas has escaped
- Cranks that spin freely without moving the sash, usually a stripped gear that's cheap to fix on its own
- Cold air you can feel around the frame even with the window fully closed and locked
- Wood frames that are soft, discoloured, or crumbling when you press a screwdriver into the sill
- Sashes that won't close flush, leaving a visible gap at the top or bottom corner
- Paint or vinyl that's cracked and letting water behind the frame, which accelerates rot underneath
Glass fogging alone doesn't always mean you need a whole new frame. Some manufacturers, including us, can replace just the sealed glass unit if the frame and hardware are still sound. That's a fraction of the price of full casement replacement windows, so it's worth checking what glass replacement costs before you commit to a bigger job.
If the frame is solid but the seal or crank has failed, fix the part, not the whole window.
Repair or replace: how to decide
Age is the biggest factor here. Vinyl casement windows installed before 2010 rarely use the Low-E coatings and Argon fills that are standard now, so even a window in decent shape is losing you money on heating every winter. Rot, warping, or hardware failure on a window over 15 years old almost always makes replacement the better financial call, since you'd be sinking repair costs into a frame that's already near the end of its service life.
Situations differ enough that a simple comparison helps:
| Symptom | Likely fix | Typical cost range (CAD) |
|---|---|---|
| Stiff or broken crank | Hardware replacement | $50-$150 |
| Torn weatherstripping | Reseal | $30-$100 |
| Foggy glass, sound frame | Glass unit swap | $150-$350 per window |
| Rotting or warped frame | Full casement window replacement | $450-$900+ per window |
| Drafts throughout the house | Whole-house replacement program | Custom quote |
These numbers reflect what we see across Ontario projects, and they'll vary with window size, glass upgrades, and grille patterns.
Utility bills are the other clue worth taking seriously. If your heating costs have crept up over the last few winters and you haven't changed your furnace or insulation, drafty casement windows are a common culprit. Energy Star Canada notes that older, poorly sealed windows can account for a significant share of a home's heat loss, which is exactly why replacement windows casement upgrades pay themselves back over time through lower bills, not just comfort.
Whole-house replacement makes sense when three or more windows are showing the same age-related symptoms, since bundling custom-built casement units usually gets you a better price per unit than replacing one window at a time. If it's just one or two units acting up, a targeted repair or single replacement keeps costs down without compromising the rest of your home's efficiency.
Step 1. Measure the window opening
Getting the measurements right is the difference between a window that fits like it was built for the space and one that needs shims, extra caulk, and constant fussing. Accurate measurements are the foundation of any successful casement window replacement, and rushing this step is the single biggest reason installers end up reordering units. Take your time here, because every other step in this guide depends on getting these numbers correct the first time.
How to measure width, height and depth
Work from the inside of the frame, not the outer trim, since that's the opening your new window actually needs to fit into. Follow these steps in order:
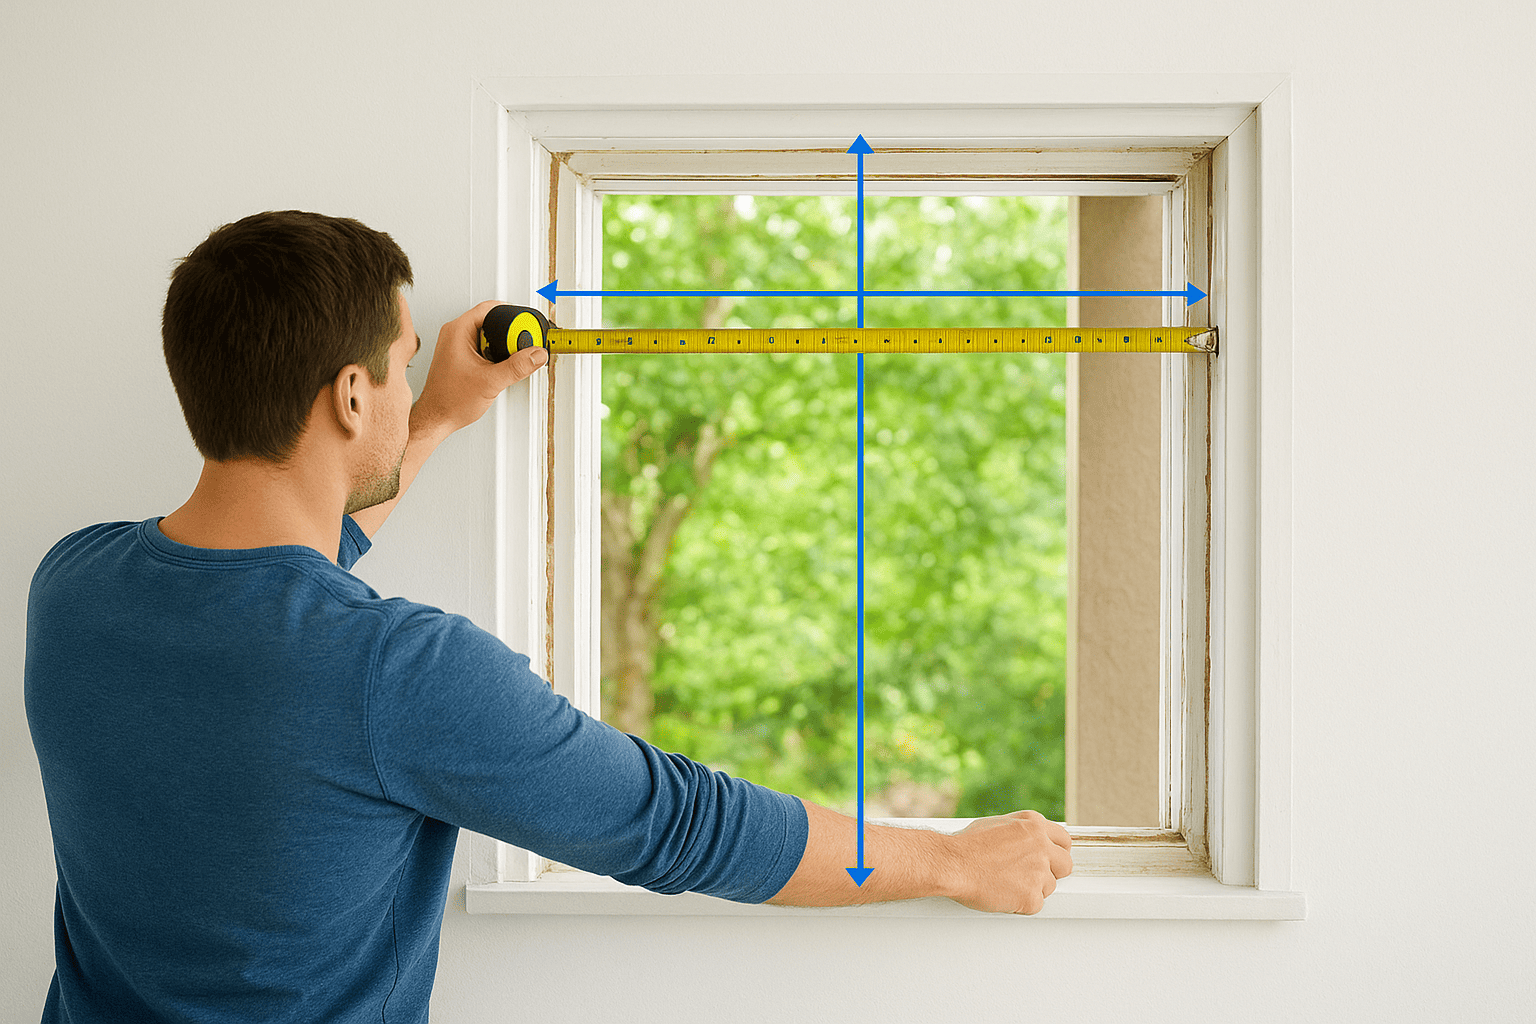
- Measure the width at the top, middle, and bottom of the opening, from jamb to jamb, and record the smallest of the three.
- Measure the height at the left, centre, and right sides, from the head jamb to the sill, and again use the smallest figure.
- Check the depth of the frame to confirm it can accommodate your chosen window's frame thickness, especially if you're upgrading to a thicker, higher-performance unit.
- Check the opening for square by measuring both diagonals corner to corner. If they differ by more than 6mm, the frame has shifted and you'll need to account for that during installation.
Always order to your smallest width and smallest height measurement, never the largest.
Ordering to the largest measurement is how homeowners end up with a window that won't sit in the opening without forcing it, which stresses the frame and voids most manufacturer warranties before the window's even installed.
Writing everything down as you go saves you from a second trip up the ladder. Round nothing up. If your numbers come out at 899mm rather than a clean 900mm, order at 899mm, since a replacement window built even a few millimetres too large won't seat properly against the existing frame.
Squareness matters just as much as size for anyone comparing replacement windows casement options, because a frame that's out of square by more than a centimetre often points to settling or rot that needs addressing before the new unit goes in. Skipping that check is how installers discover structural problems mid-job instead of during planning, when they're far easier and cheaper to fix.
Step 2. Choose your replacement window and materials
Once you've got accurate measurements, the next decision is what you're actually ordering. Casement replacement windows come in a handful of frame materials, and the choice affects everything from your energy bills to how often you'll be doing this job again in another decade. Vinyl casement windows are the standard choice for most Ontario homes because vinyl doesn't rot, doesn't need painting, and handles temperature swings better than wood or aluminum without warping.
Comparing frame materials and glass options
Glass packages matter just as much as the frame. Look for Low-E coatings and Argon gas fills as the baseline for an energy efficient glass package, since both are standard on any properly built casement unit sold in Canada today and directly cut heat loss through the glass.
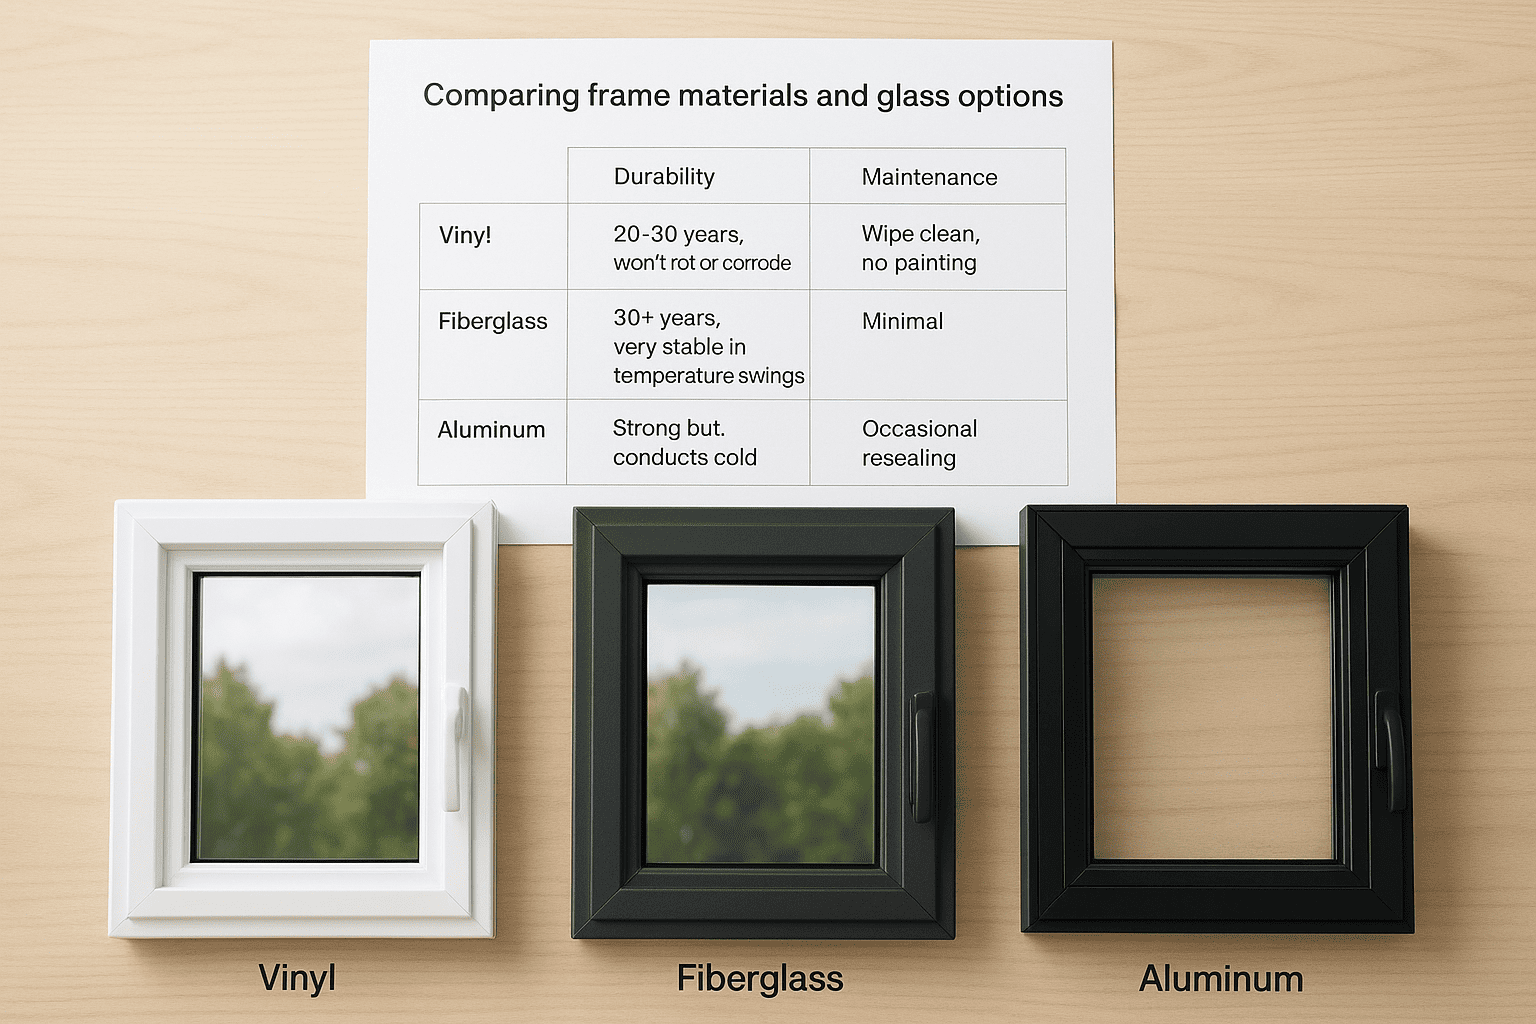
| Material | Durability | Maintenance | Typical cost impact | |---|---|---| | Vinyl | 20-30 years, won't rot or corrode | Wipe clean, no painting | Baseline | | Fibreglass | 30+ years, very stable in temperature swings | Minimal | +10-20% over vinyl | | Aluminum | Strong but conducts cold | Occasional resealing | Rarely used residentially in Ontario |
Grille patterns, hardware finish, and frame colour are worth deciding now too, since changing your mind after the order is placed means waiting on a new production run. If you're matching existing trim or a specific architectural style, bring a photo of your home's exterior when you get your quote.
The glass package matters more than the frame colour, so spend your budget there first.
Where to buy and what to ask for
Buying replacement casement windows direct from a manufacturer, rather than through a retail middleman, is usually where the real savings show up, since you're cutting out a markup layer without sacrificing quality. We build every unit to order at our GTA facility and back them with a 15-year seal failure warranty, so ask any supplier what their warranty actually covers before you sign anything.
A few questions worth putting to any supplier before you order:
- What's the seal failure warranty period, and does it cover labour or just parts?
- Are the units built in Canada to Canadian climate standards, or imported?
- Can they price-match a competing quote, and by how much?
- What's the lead time from order to delivery?
Getting straight answers here now saves headaches once installation day arrives.
Step 3. Remove the old casement window
Removing the old unit is where casement replacement windows projects can go sideways fast if you rush the demolition. Work from outside first if you can get a ladder safely in place, since that's usually where the exterior caulk and trim need cutting before the sash will budge. Never force a stuck sash with a pry bar against the glass, because a cracked pane mid-removal turns a straightforward job into an unplanned trip to the hardware store.
Tools and removal steps
Gather your tools before you start so you're not climbing down mid-job to fetch something you forgot:
- Cut the exterior caulk line with a utility knife, running it all the way around the frame where it meets the siding or brick.
- Remove interior trim and stops with a flat pry bar, working slowly to avoid splitting the wood if you plan to reuse it.
- Disconnect the crank hardware from the sash if it's still attached, since leaving it in place makes the frame heavier and harder to manoeuvre.
- Cut through any remaining fasteners holding the frame to the rough opening, usually screws or nails driven through the jambs.
- Lift the frame out with a helper, since even a mid-sized casement window is awkward for one person to control safely.
A window that comes out clean, without cracking trim or damaging the rough opening, sets up every later step for success.
Checking the rough opening closely once the old frame is out matters more than most homeowners expect. Damp insulation, soft wood, or signs of pest activity all need addressing now, before a new frame goes anywhere near that space. Sweeping out debris and vacuuming loose insulation gives you a clean surface to work from and lets you spot problems that were hidden behind the old unit for years.
Finally, keep the old hardware and glass out of the general trash if your municipality runs separate recycling streams for vinyl and glass, since most Ontario waste programs handle both. If you're not confident handling any of these steps yourself, our installation team handles removal as part of every casement window replacement we quote, which avoids the risk of damaging the rough opening on a DIY attempt.
Step 4. Install the new window frame
With the rough opening clean and dry, dry-fit the new casement replacement windows unit before you commit to any fasteners. Set it into the opening, centre it left to right, and check that it sits flush against the exterior stop or brick moulding without gaps. This test run catches sizing problems while you can still pull the frame back out, rather than after it's screwed and shimmed into place.
Setting, shimming and levelling the frame
Once the dry fit looks right, run a continuous bead of exterior-grade sealant along the back of the exterior stop, then set the frame into the opening for good. Getting the frame plumb, level, and square matters more here than almost anywhere else in the job, since a frame installed even slightly out of true will bind the crank mechanism and strain the seal within a season.
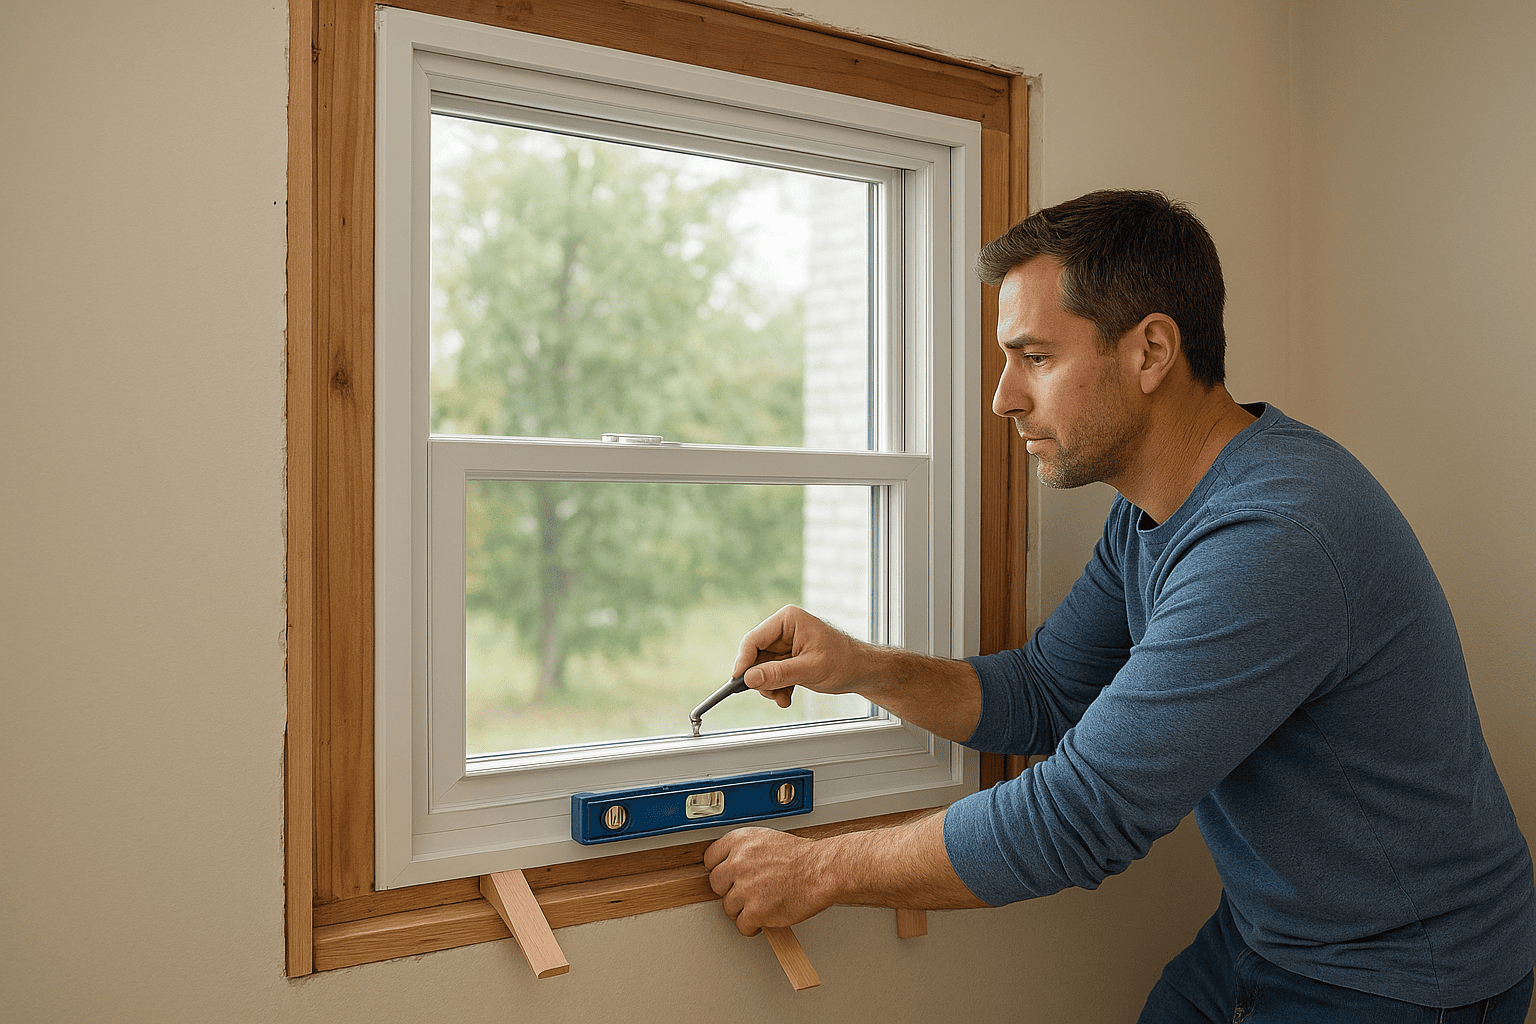
- Shim the sill first, placing pairs of tapered shims under the bottom corners and centre to bring the frame level side to side.
- Shim the side jambs at the top, middle, and bottom, checking plumb with a level after each pair goes in.
- Check for square by measuring both diagonals again, exactly as you did when measuring the opening; they should match within a few millimetres.
- Fasten through the jambs into the rough opening framing, using the manufacturer's recommended screw type and spacing, usually every 300 to 400mm.
- Test the sash before fully fastening, cranking it open and closed to confirm smooth operation with no binding against the frame.
A frame that isn't plumb and square will fight the crank mechanism for the life of the window.
Don't overtighten the fasteners as you go, since cranking screws down too hard can bow the vinyl frame inward and cause the same binding problem you're trying to avoid. Snug is enough; the shims are doing the structural work, not brute force on the screws.
Checking operation before moving on
Before you move on to insulating and trimming, open and close the sash fully several times, checking that it seats evenly against the frame on all sides with no light gaps showing. Confirm the locking hardware engages cleanly and that the crank turns without resistance throughout its full range. Any binding at this stage is far easier to correct with the frame still accessible than after trim and insulation cover the jambs, so don't skip this check even if the job feels finished.
Step 5. Insulate, seal and trim the window
With the frame fastened and operating smoothly, the gap between the jamb and the rough opening still needs filling before you close everything up with trim. Skipping this step leaves an air channel running straight around your new window, which defeats half the purpose of a casement window replacement in the first place. Take your time here, because the insulation choice you make now affects both the frame's shape and the window's long-term performance.
Filling the gap without bowing the frame
Use a low-expansion foam rated for windows and doors, never the standard high-expansion foam sold for general gap filling. Standard foam expands with enough force to bow a vinyl frame inward, which throws the sash out of square and brings back the exact binding problem you fixed during installation. Apply it in a thin, continuous bead, filling roughly a third of the cavity at a time, and let each pass cure before adding more.
Foam should fill the gap gently, not force the frame out of shape.
Check the sash operation again once the foam has cured fully, usually within 24 hours, since foam that's still expanding can shift the frame even after you've moved on to trim work.
Sealing exterior and finishing interior trim
Once the foam has set, finish the job with sealant and trim in this order:
- Run a bead of exterior-grade sealant along the joint where the frame meets the siding or brick, tooling it smooth so water sheds away from the wall.
- Reinstall or replace exterior trim and brick moulding, checking that fasteners don't pierce the frame itself.
- Fit interior trim and stops, reusing the original pieces if they came off cleanly during removal, or cutting new ones to match.
- Caulk the interior trim joints with a paintable sealant for a finished look and an added air barrier.
- Wipe down the glass and frame to clear any foam overspray or sealant smears before they cure hard.
Getting the exterior seal right matters more than most homeowners assume, since a gap left open at the sill is where wind-driven rain finds its way behind the cladding during an Ontario storm. Trim work is also your last real chance to catch a frame that's sitting slightly proud or recessed against the wall, so step back and eyeball the reveal on all four sides before you call the job finished.
Step 6. Test, adjust and maintain the window
Give the window a full week of normal use before you call the casement window replacement finished, since foam curing, temperature swings, and minor settling can all reveal small issues that weren't obvious on install day. Open and close the sash daily during that first week, checking that the crank still turns smoothly and the lock engages without you having to lift or push the sash into place. If you notice any resistance creeping in, it's far easier to correct a shim or fastener now than after the trim has been painted and caulked for months.
A window that operates smoothly a week later is a window that was installed correctly the first time.
Fine-tuning the crank and lock
Most binding issues at this stage trace back to one of a few common causes, and each has a straightforward fix:
- Loosen and reset a fastener if the sash drags on one corner, since a screw driven too tight can pull the frame slightly out of square.
- Add or remove a shim behind the jamb if the reveal looks uneven when you sight down the frame.
- Lubricate the crank gear with a silicone-based spray if turning feels gritty rather than tight, never with oil, which attracts dust and grime over time (here's what a casement crank window is and how it works).
- Check the strike plate alignment if the lock feels stiff, since even a millimetre of misalignment forces the hardware to work harder than it should, and choosing and replacing casement window locks is straightforward if the mechanism itself is worn.
Addressing these small adjustments now protects the warranty on your new unit, since most manufacturers, ours included, expect reasonable homeowner upkeep as part of the coverage terms.
Long-term maintenance checklist
Keeping a replacement casement window performing well for its full 20 to 30 year lifespan doesn't take much effort, but it does take consistency:
- Wipe down tracks and hinges twice a year to clear grit that accelerates wear
- Inspect exterior caulk annually and reapply where it's cracked or pulled away
- Test the crank and lock each spring before the humid season sets in
- Clean weep holes along the sill so water drains properly instead of pooling
- Watch for condensation between panes, which signals a seal failure worth addressing early
Staying on top of this short list is what separates a window that lasts three decades from one that starts causing problems again within five years.
Getting your replacement project right
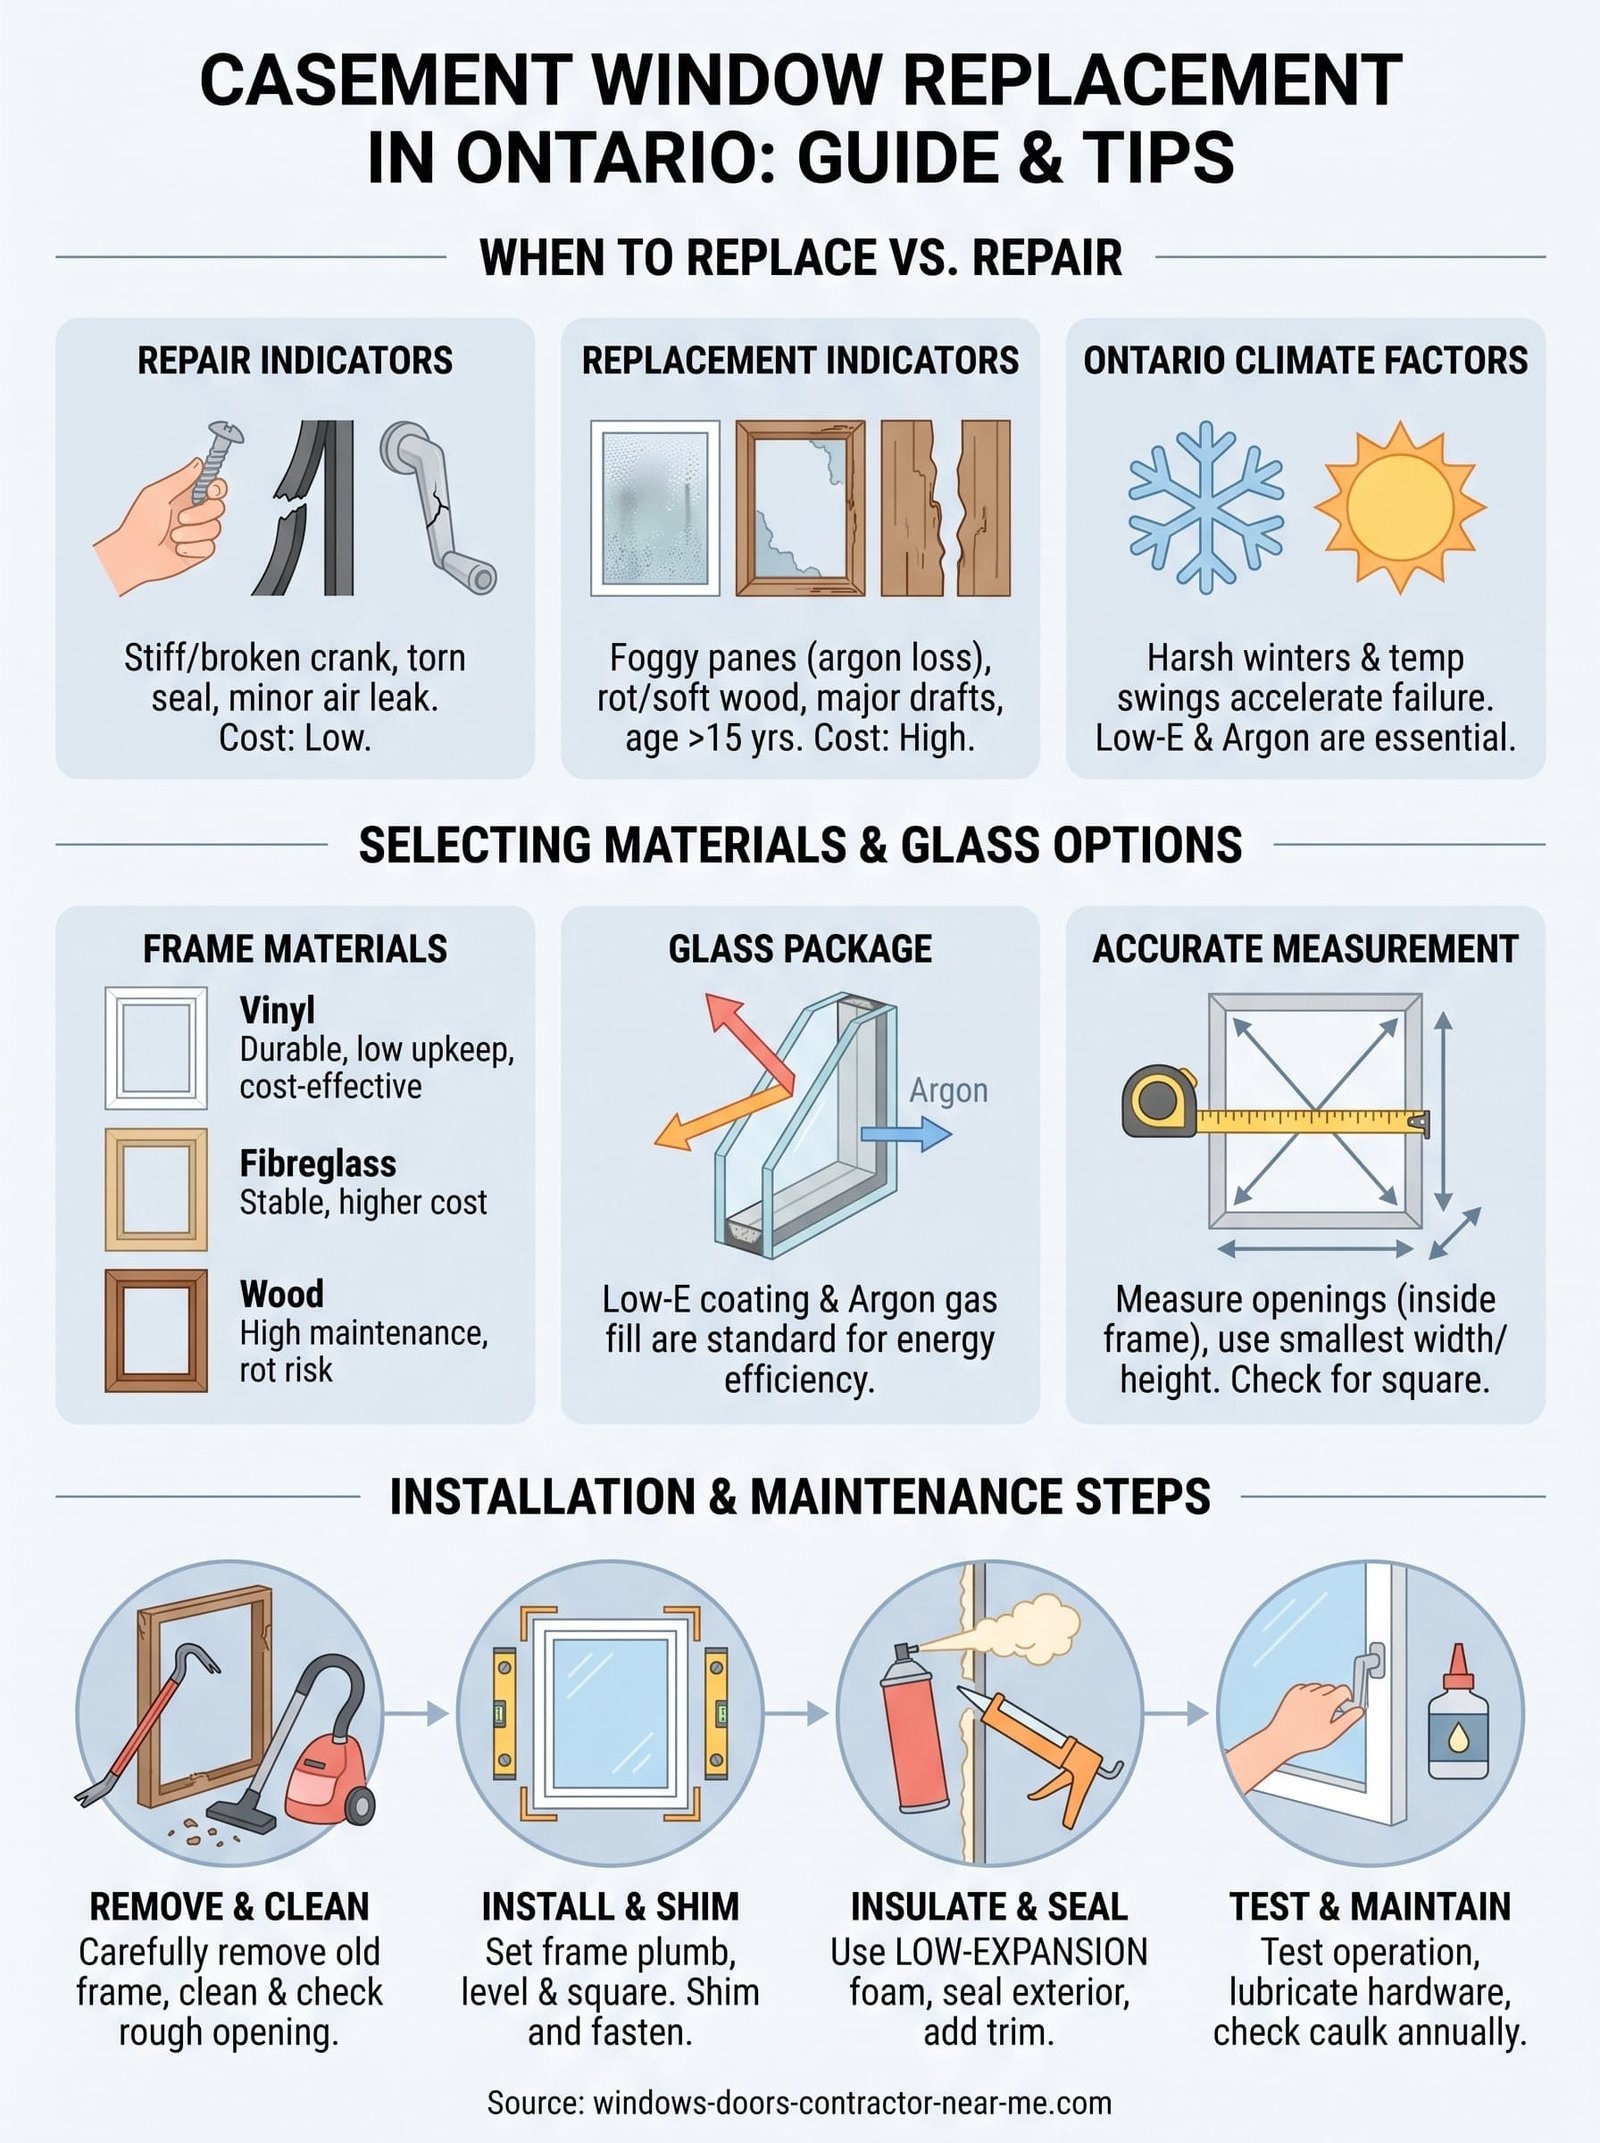
Getting casement windows replacement right comes down to the same fundamentals every time: honest diagnosis, accurate measurements, and materials built for Ontario's climate rather than a milder one. Skip any of those steps and you're back to square one within a few years, patching the same drafts and fog you started with. Rushing the order, guessing at the opening size, or grabbing the cheapest vinyl on offer are the mistakes that turn a straightforward upgrade into a repeat job.
Patience through each stage, from measuring twice to letting the foam cure before trimming, pays off in a window that operates smoothly for decades rather than months. If you'd rather hand the measuring, sourcing, and installation to people who've done this since 2006, book a free in-home casement window quote and we'll walk your home, take accurate measurements, and quote you factory-direct pricing with no middleman markup.